Friday, March 12, 2021

SQL Server Management Studio 2012 Color Theme Support

This information is a summarization from Brad Gearon’s blog (blog doesn't exist any longer, hence no link). All credits go to the him and all the blog contributors. I added here so I can remember the steps for myself.

These are the things needed to support color theme in SQL Server Management Studio 2012.

Putting it together (this is from Arthur from the Brad’s blog. Thanks Arthur!)…

  1. Install the 2012 Color Theme Editor.
  2. Find the files somehwere in “C:\Users\xxxxx\AppData\Local\Microsoft\VisualStudio\10.0\Extensions\” .. for me, it was in “\shvn3avp.com” for the current version of the plugin.
  3. Copy those files to a new folder: “C:\Program Files (x86)\Microsoft SQL Server\110\Tools\Binn\ManagementStudio\Extensions\VSTheme”
  4. Now extract the extension.vsixmanifest file from Brad’s vstheme.zip file and replace the one in “…ManagementStudio\Extensions\VSTheme”.

    Note: The important difference in the vsixmanifest files is the lines:
  5. ssms
    instead of visual studio product numbers

  6. Start SQL Server Management Studio and enjoy the colors.

Keep Column Headers Visible in SSRS

The information below is a duplication from article written by Ginger Keys Daniel posted in SQLServerCentral site (great SQL resource). It's here so I can have a record incase the original posting is removed. All credits belong to Ginger Keys Daniel. Thank you Ginger.


When scrolling through the pages of a SQL Server Reporting Services (SSRS) report, it is very useful to be able to see the column headers throughout the report. Let’s say you have successfully created an SSRS report using Visual Studio, and everything looks wonderful…except the headers on your columns disappear when you scroll down the page. You have even set the properties of your Tablix to “Keep Headers Visible While Scrolling”, but it still doesn’t work! Trying to keep the column headings visible while you scroll down the page of your SSRS report can be a frustrating endeavor. The following steps will demonstrate how to make it work.

Adjust Tablix Properties In Visual Studio, make sure you are on the Design tab of your report. Right click on the upper left corner of your Tablix to open the Tablix Properties.

When the Properties dialog box opens, un-check the Keep header visible while scrolling checkboxes for both Row Headers and Column Headers. This doesn’t seem logical, but trust me.

Go to Advanced Mode for the Grouping Section. You can do this in the Design tab of your report, click on drop down arrow on the far right side of the Grouping Section and select Advanced Mode.

A Static property element will show above your Row Groups as shown below. Click on the top Static cell which represents the first column header of the report. A properties box will open on the right side of the page for this Static element.

Change Tablix Member properties for the Static element as shown

  • Fixed Data = True
  • Keep With Group = After
  • Repeat On New Page = True

Preview and Run your Report

Click on the Preview tab on your report, save it, and deploy the report to Reporting Services. Below you can see the report as shown in SSRS browser.

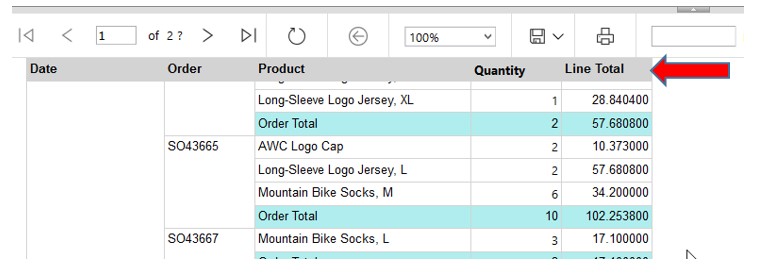
As you can see below, the page header disappears when you scroll down, but the column headers remain visible. (note: You may need to change the background color of the column headers, else the text will run over one another when scrolling)

Conclusion

Sometimes when creating a report for SQL Server Reporting Services, you want the column headers to remain visible while you scroll down the report page. Adjusting the Tablix properties isn’t as straightforward as it should be, and can be frustrating to figure out. Following the steps above will keep your column headers visible in your reports.

Friday, April 11, 2014

Disable Automatic Maintenance in Windows Server 2012 R2

Automatic Maintenance in Windows Server 2012 R2 is very resource intensive process. Even though it might be scheduled to run in the middle of the night, the process may continues running throughout the day. This can severely impact the performance of the system.

The following instructions will disable the Automatic Maintenance in Windows Server 2012 R2. I found the instructions from the post by Lars Jørgensen and this blog.

Disclaimer: Not sure if disabling the Automatic Maintenance will disable Windows Updates too. Apply the steps at YOUR OWN RISK and PERIL.

  1. You will need the PsExec command from here.
  2. Open a command prompt in Administrator mode.
  3. Run this command (if you are on the local server, you can skip the \\SERVERNAME parameter):
  4. psexec \\SERVERNAME -s schtasks /change /tn “\Microsoft\Windows\TaskScheduler\Maintenance Configurator” /DISABLE

  5. You will receive a SUCCESS notification from the command ran above if all went well.

  6. Check it in your Task Scheduler. It should look like below:
    image

  7. Done

That should reduce some server performance headache. Good Luck!!!

Thursday, March 13, 2014

Apply alternate background colors to Group headers


The instruction below is for one group header. But it can be easily extended for use with multiple group headers.

  1. Create a group in the report.
  2. At the Report level, select the Script tab.
  3. Set iRow = 0 in initialize() method of the report. “iRowcould be any variable name.
    image
  4. Return to the Layout tab of report and select the Group header row (where you want to apply style).
  5. Click on Script tab. Select onRender from Script drop down
  6. Enter the script below:
    if (iRow == 0) {
            this.getStyle().backgroundColor = "silver";
            iRow = 1;
    }  else {
            this.getStyle().backgroundColor = "white";
            iRow = 0;
    }

    image
  7. Done. Preview the report to see the changes.

Wednesday, August 14, 2013

Overdrive Media Console – Error: 0x80070057 The Parameter is incorrect

This can be corrected by resetting the Digital Rights Management (DRM) for Windows Media Player.

Please follow these steps carefully as this is an involved process. The steps vary depending upon which Operating System you use. The steps for Windows 7 and 8.

  1. Open the 'Control Panel'.
  2. Open 'Folder Options' and select the 'View' tab.
  3. Select 'Show hidden files and folders'.
  4. Uncheck 'Hide protected operating system files'.
  5. In the warning message you receive, click 'Yes'.
  6. Click 'OK'.
  7. Close the Control Panel.
  8. Open Windows Explorer and navigate to: c:\ProgramData\Microsoft\Windows\DRM
  9. Delete ONLY the following 4 files:
    • blackbox.bin
    • drmstore.hds
    • v3ks.bla
    • v3ks.sec
  10. Close Windows Explorer
  11. Open Internet Explorer as Administrator ((hold down SHIFT key and right-click on the icon, select the Run as Administrator).
  12. Go to this address: http://drmlicense.one.microsoft.com/Indivsite/en/indivit.asp
  13. Click the Upgrade button and follow the prompts to finish.
  14. Overdrive Media Console should be able to play the protected content now.

Good luck!

Tuesday, June 4, 2013

Configure Apache HTTP Server Plug-In with Weblogic Server

Requirement:

  • Apache HTTP Server 2.2 or newer is already running as Windows service on default port 80
  • Weblogic 10.3 or newer

I am using Apache 2.2 and Weblogic 12c for this post and demonstrating to access the Weblogic Console via Apache HTTP Server.

Steps to configure Apache HTTP Server Plug-In with Weblogic server

1. Identify the plug-in shared object file for your version of Apache in below table.

Apache Version
Regular Strength Encryption
128-bit Encryption

Standard Apache Version 2.0.x

  • mod_wl_20.so
  • mod_wl128_20.so

Standard Apache Version 2.2.x

  • mod_wl_22.so
  • mod_wl128_22.so
2. Verify that the WebLogic Server Apache HTTP Server Plug-In mod_so.c module is enabled.

The Apache HTTP Server Plug-In will be installed in your Apache installation as a Dynamic Shared Object (DSO). DSO support in Apache is based on module mod_so.c, which must be enabled before mod_wl_20.so is loaded. If you installed Apache HTTP Server using the script supplied by Apache, mod_so.c is already enabled. Verify that mod_so.c is enabled by executing the following command:

%APACHE_HOME%\bin\httpd.exe -l

-- Where APACHE_HOME is the directory containing your Apache installation

3. Copy the appropriate Weblogic Proxy plug-ins from Weblogic Installation to Apache installation.

Windows: %WEBLOGIC_HOME%\server\plugin\win\32\mod_wl_22.so to %APACHE_HOME%\modules\10.3\mod_wl_22.so

Solaris:  $WEBLOGIC_HOME/server/plugin/solaris/sparc/mod_wl_22.so to %APACHE_HOME%/modules/10.3/mod_wl_22.so

Note: To differentiate the version of Weblogic proxy plug-ins, create a directory named with Weblogic version under %APACHE_HOME%/modules

4. Install the Apache HTTP Server Plug-In module for Apache

Add the following line to your APACHE_HOME/conf/httpd.conf file manually:

#Weblogic Module
LoadModule weblogic_module modules/mod_wl_20.so

5. Modify and add the configuration below to the same APACHE_HOME/conf/httpd.conf

Modify the setting per your requirement. In my example below I am trying to access Weblogic console via Apache re-direction.

<IfModule mod_weblogic.c>
  WebLogicCluster   <servername>:<port number>
  MatchExpression    *.jsp
  Debug                    ON
  WLLogFile               c:/temp/global_proxy.log
  WLTempDir             "c:\temp"
  DebugConfigInfo     On
  KeepAliveEnabled     ON
  KeepAliveSecs         10
</IfModule>

<Location /console>
  SetHandler weblogic-handler
</Location>

The Apache HTTP Server Plug-In recognizes the parameters listed in General Parameters for Web Server Plug-Ins. To modify the behavior of your Apache HTTP Server Plug-In, define these parameters:

-- In a Location block, for parameters that apply to proxying by path, or
-- In an IfModule block, for parameters that apply to proxying by MIME type

6. Verify the the configurations in the APACHE_HOME\conf\httpd.conf file is accurate

Use the following command:
%APACHE_HOME%\bin\httpd.exe –t

The output of this command reports any errors in your httpd.conf file or returns:
Syntax OK

7. Restart Apache HTTP Server
8. Test the plug-in

Open a browser and setting the URL to the Apache Server + ":" + <port> + “/console”, which should bring up the default WebLogic Server HTML page, welcome file, or default servlet, as defined for the default Web Application on WebLogic Server.

For example:
http://localhost/console
image

9. Success!!!

How to DISABLE and ENABLE Production Mode in WebLogic domain for WebLogic 9 & above

Way to toggle between prod and dev mode for Weblogic

WebLogic Issues & Solutions: How to DISABLE and ENABLE Production Mode in WebLogic domain for WebLogic 9 & above